


Beyond kubectl: Managing .NET Workloads Across Kubernetes Clusters with Rancher

Mehdi Hadeli
@mehdihadeli
On this page
Table of contents
kubectl is the right tool for one cluster. The day your team runs a second cluster, or a second team joins the first one, the workflow that worked on a laptop stops scaling: credentials multiply, RBAC drifts, and "which cluster was that again?" becomes a meeting agenda item. This article is about what comes next: a management plane that sits above Kubernetes and drives every cluster's API from one place.
We use Rancher for that job and run it on a k3d cluster, continuing the local-first story from the article "Hosting a .NET 10 API on Kubernetes with k3d". That earlier article covered how traffic gets into a single cluster: k3d's load balancer, MetalLB for on-premises clusters, and the Ingress versus Gateway API decision. We will not repeat that material here. Instead, we answer the question that follows it: once you have clusters, how do you manage them as a team?
Introduction
Rancher is a Kubernetes management platform: a web UI, an RBAC engine, and a GitOps pipeline, all bundled into one Helm chart. It runs on a cluster, imports other clusters through their Kubernetes API, and gives you one pane of glass for workloads, projects, users, and delivery.
This article walks through a complete sample and uses it to demonstrate five ideas in order. The sample deploys the same .NET 10 todo API from the previous article, this time on a Rancher-managed setup with PostgreSQL and RabbitMQ as its backing services:
- Management plane vs data plane. Rancher runs on one cluster and manages many.
- The
localcluster. Rancher imports its own cluster automatically and manages itself. - Projects instead of namespaces. Rancher's grouping and RBAC boundary above plain namespaces.
- Multi-cluster import. A second k3d cluster joins the same management plane with one
kubectl apply. - Fleet GitOps. The app is delivered to every cluster from a Git repository, with no
kubectl applyon any cluster.
The goal is to end with a reproducible two-cluster setup on your laptop: Rancher in the UI, the same .NET 10 todo API answering from both clusters backed by PostgreSQL and RabbitMQ, and the Git repository as the source of truth for both deployments. The sample also includes the same Ingress and Gateway API manifests from the previous article so you can see both traffic models inside Rancher.
The full sample lives in the rancher-multi-cluster-setup repository, and the rancher-multi-cluster-setup README walks through the setup step by step. Every snippet in this article comes from that repository.
Objectives
- Install Rancher Manager on a k3d cluster and log in for the first time.
- Understand the management-plane model: one Rancher, many clusters.
- Replace raw namespaces with Rancher projects for grouping and RBAC.
- Deploy the same .NET 10 todo API from the previous article, with PostgreSQL and RabbitMQ, from the Rancher UI and prove it is the same YAML you already know.
- Import a second k3d cluster and manage both from one UI.
- Deliver the app to both clusters with Fleet GitOps from a Git repository.
- Compare the Ingress and Gateway API resources side-by-side under Rancher service discovery.
The Problem with kubectl
Before Rancher makes sense, the pain has to be concrete. With one cluster, your mental model is a single kubeconfig context:
kubectl config get-contexts
kubectl get pods -A
kubectl apply -f deployment.yaml
Now add a second cluster. Each one needs its own context, its own credentials, and its own set of RBAC rules. kubectl handles that fine mechanically. Contexts are cheap. What is missing is the organization:
RBAC is per namespace and per cluster, and nothing in Kubernetes tells a new team member which namespaces they should even look at. Enforcing "this team gets 2 vCPU" means wiring ResourceQuota objects into every namespace the team owns. Deploying the same app to two clusters means remembering to run kubectl apply in two contexts. And "who changed the production cluster last night?" is not a question kubectl can answer.
Rancher answers all four with concepts that sit above the Kubernetes API: users, projects, roles, and GitRepo-driven delivery. The clusters themselves stay untouched. Rancher is an operator, not a replacement.
Recommended addition from the field. If your team is just starting with multi-cluster, capture these four failure modes early: wrong-context kubectl commands, drifted RBAC roles, per-cluster monitoring silos, and inconsistent network policies. They are not visible in resource quotas, but they show up in incident response time. Rancher's management plane fixes them by centralizing authentication, RBAC, and policy delivery.
Management Plane vs Data Plane
The mental model to internalize: Rancher is a management plane, not a cluster. It runs as a set of pods on one Kubernetes cluster (the local cluster), and it talks to every other cluster through that cluster's normal Kubernetes API. The workloads you manage, your .NET pods, are the data plane and never run inside Rancher.
%%{init: {
  'theme': 'base',
  'themeVariables': {
    'background': '#ffffff',
    'primaryColor': '#ffffff',
    'primaryTextColor': '#2c3e50',
    'primaryBorderColor': '#bdc3c7',
    'lineColor': '#34495e',
    'secondaryColor': '#f8f9fa',
    'tertiaryColor': '#f1f3f5',
    'fontFamily': 'Segoe UI, Arial, sans-serif',
    'fontSize': '14px',
    'edgeLabelBackground': '#ffffff',
    'nodeBorder': '2px',
    'mainBkg': '#ffffff',
    'nodePadding': '12px',
    'subGraphBkg': '#fafbfc',
    'subGraphBorder': '#dfe6e9'
  }
}}%%
flowchart TB
    classDef infra fill:#f3e5f5,stroke:#8e24aa,color:#4a148c
    classDef compute fill:#e3f2fd,stroke:#1565c0,color:#0d47a1
    classDef gateway fill:#e8eaf6,stroke:#3949ab,color:#1a237e
    classDef external fill:#f5f5f5,stroke:#616161,color:#424242

    subgraph RancherDev["rancher-mgmt cluster (k3d)"]
        direction TB
        Manager["Rancher Manager<br/>cattle-system namespace<br/>UI + API + RBAC engine"]:::gateway
        LocalWorkloads[".NET todo API pods<br/>dotnet-k8s namespace"]:::compute
    end

    subgraph Dev2["workload-dev cluster (k3d)"]
        direction TB
        Dev2Workloads["Same .NET todo API pods<br/>dotnet-k8s namespace"]:::compute
        Agent["cattle-cluster-agent<br/>phones home to Rancher"]:::infra
    end

    Browser["Browser / developer"]:::external

    Browser -->|"https://rancher.local"| Manager
    Manager -->|"Kubernetes API of local cluster"| LocalWorkloads
    Manager <-->|"Kubernetes API of workload-dev<br/>via cattle-cluster-agent"| Agent
    Agent --> Dev2Workloads
Read the diagram top to bottom. Rancher Manager lives in the cattle-system namespace of the rancher-mgmt cluster. It manages that same cluster through its own API (no special path), and it manages workload-dev through an agent pod that connects back to Rancher. The .NET workloads run in both clusters, inside the dotnet-k8s namespace, managed by Rancher but deployed by normal Kubernetes mechanics.
The Rancher Stack: k3s, k3d, RKE2, Rancher
Rancher is one product in a family, and the naming confuses people, so let us place each piece:
| Piece | What it is | Role in this article |
|---|---|---|
| k3s | Lightweight, certified Kubernetes distribution (Rancher's) | The Kubernetes inside k3d |
| k3d | k3s wrapped in Docker containers | Our laptop clusters |
| RKE2 | Rancher's hardened, production-grade Kubernetes distribution | What you would manage on real servers |
| Rancher Manager | The management platform | Installed on k3d, manages both clusters |
The previous article in this series already established the bottom half of the stack: k3d for laptop-sized clusters, built from k3s, and the fastest local feedback loop for Kubernetes work. Rancher completes the top half: when your setup grows past one cluster, you add a management plane instead of more kubeconfig gymnastics.
For this sample we stay entirely on k3d: Rancher running on k3d, managing a second k3d cluster. Everything you see maps one-to-one to production. Swap k3d for RKE2 clusters and the management model does not change.
Architecture Overview
The sample creates two k3d clusters. rancher-mgmt is the management cluster: it runs Rancher and the demo workload (the .NET todo API with PostgreSQL and RabbitMQ). workload-dev is the managed cluster: it runs only the demo workload and a small agent that connects it to Rancher. Host ports 80 and 443 map into rancher-mgmt so the Rancher UI is reachable from the browser; workload-dev needs no inbound ports at all because Rancher reaches it through the agent's outbound connection.
%%{init: {
  'theme': 'base',
  'themeVariables': {
    'background': '#ffffff',
    'primaryColor': '#ffffff',
    'primaryTextColor': '#2c3e50',
    'primaryBorderColor': '#bdc3c7',
    'lineColor': '#34495e',
    'secondaryColor': '#f8f9fa',
    'tertiaryColor': '#f1f3f5',
    'fontFamily': 'Segoe UI, Arial, sans-serif',
    'fontSize': '14px',
    'edgeLabelBackground': '#ffffff',
    'nodeBorder': '2px',
    'mainBkg': '#ffffff',
    'nodePadding': '12px',
    'subGraphBkg': '#fafbfc',
    'subGraphBorder': '#dfe6e9'
  }
}}%%
flowchart LR
    classDef external fill:#f5f5f5,stroke:#616161,color:#424242
    classDef gateway fill:#e8eaf6,stroke:#3949ab,color:#1a237e
    classDef compute fill:#e3f2fd,stroke:#1565c0,color:#0d47a1
    classDef infra fill:#f3e5f5,stroke:#8e24aa,color:#4a148c

    subgraph Host["Host Machine"]
        Browser["Browser"]:::external
        Terminal["kubectl / helm"]:::external
    end

    subgraph RancherDev["rancher-mgmt (k3d, 4 GB server)"]
        direction TB
        LB["k3d serverlb<br/>ports 80/443"]:::gateway
        Nginx["Rancher nginx ingress<br/>cattle-system"]:::gateway
        Rancher["Rancher Manager"]:::infra
        CertManager["cert-manager"]:::infra
        App1["dotnet-k8s pods<br/>+ Postgres + RabbitMQ"]:::compute
    end

    subgraph Dev2["workload-dev (k3d, 2 GB server)"]
        direction TB
        App2["dotnet-k8s pods<br/>+ Postgres + RabbitMQ"]:::compute
    end

    Browser -->|"rancher.local"| LB
    LB --> Nginx
    Nginx --> Rancher
    Rancher -->|"manages local cluster"| App1
    Rancher <-->|"agent connection"| App2
    Terminal -->|"kubectl/helm (setup only)"| RancherDev
Two details in this diagram are worth pointing out. First, cert-manager sits next to Rancher because the chart uses it to issue the self-signed certificate for the UI. Rancher requires a cert, and for a local demo a self-signed one from cert-manager is exactly right. Second, the k3d cluster disables Traefik at creation time: k3s ships Traefik by default, and Traefik would grab ports 80 and 443 before Rancher's bundled nginx ingress can bind them.
Prerequisites
The same toolbox as the previous article, no additions:
| Tool | Purpose |
|---|---|
| Docker | Container runtime for k3d |
| kubectl | Kubernetes CLI, used by the scripts and the UI import |
| k3d | Creates both k3d clusters |
| helm | Installs cert-manager and the Rancher chart |
On Windows, run everything from Git Bash, and make sure cgroup v2 is enabled in WSL2 (the .wslconfig fix is documented in the previous article). Rancher Manager needs roughly 2 vCPU and 4 GB of RAM, which is why the sample's cluster script gives the k3d server node 4 GB instead of k3d's default.
Live Walkthrough: What We Validated
The rest of this article explains the concepts; this section records the exact steps that worked on a Windows 11 laptop with Docker Desktop 27.0.3, k3d v5.9.0, k3s v1.35.5+k3s1, and Helm v4.2.3. If you follow the sample, you should end up with the same screens.
1. Create the management cluster
Run the sample script (or the equivalent k3d cluster create command). The cluster is named rancher-mgmt, gets 4 GB of RAM, and exposes host ports 80/443 to the k3d load balancer. Traefik is disabled so ingress-nginx can bind those ports later.
./scripts/setup-cluster.sh
kubectl get nodes
# NAME                           STATUS   ROLES                  AGE   VERSION
# k3d-rancher-mgmt-server-0      Ready    control-plane,master   30s   v1.35.5+k3s1
2. Install Rancher and ingress-nginx
The sample's setup-rancher.sh installs cert-manager, the Rancher chart, and then ingress-nginx with hostNetwork=true. It also patches the Rancher Ingress to ingressClassName: nginx because the chart leaves it blank on some versions.
./scripts/setup-rancher.shAt the end of the script curl -k https://rancher.local/ping must return pong. If it does not, check that:
127.0.0.1 rancher.localis in your hosts file.- The ingress-nginx controller pod is running in namespace
ingress-nginx. kubectl -n cattle-system get ingress ranchershowsingressClassName: nginx.
3. First login
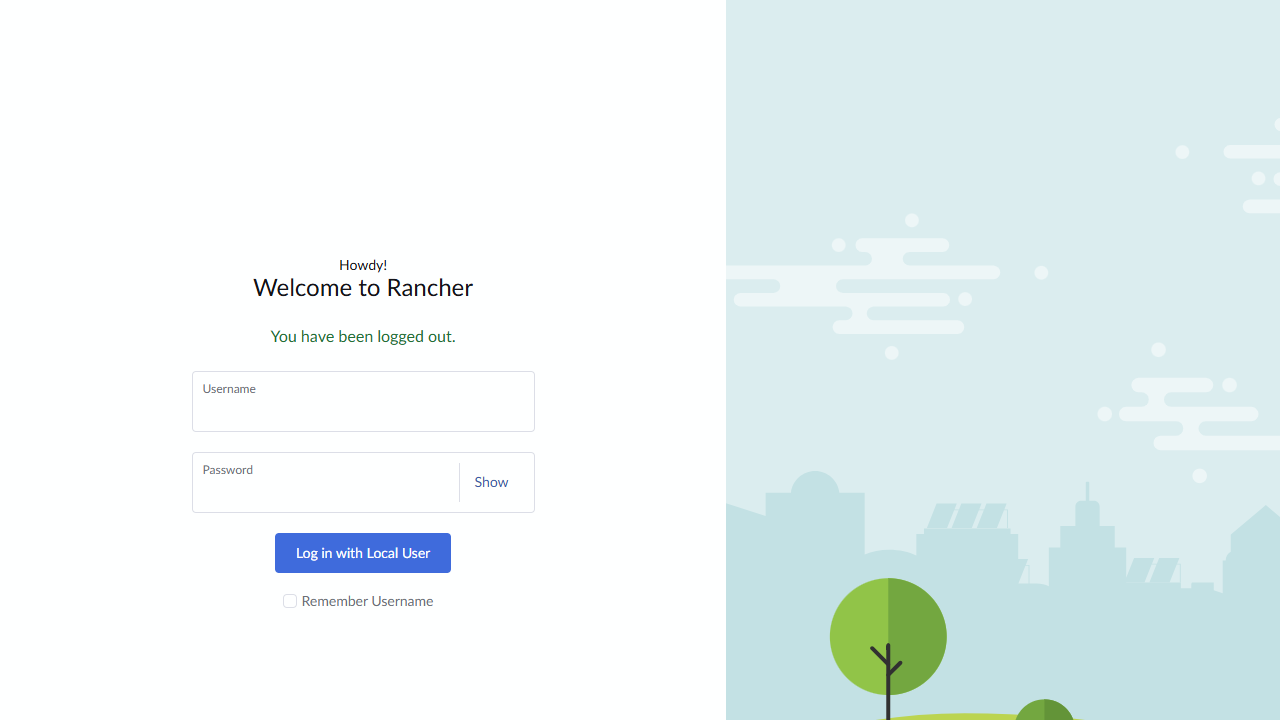
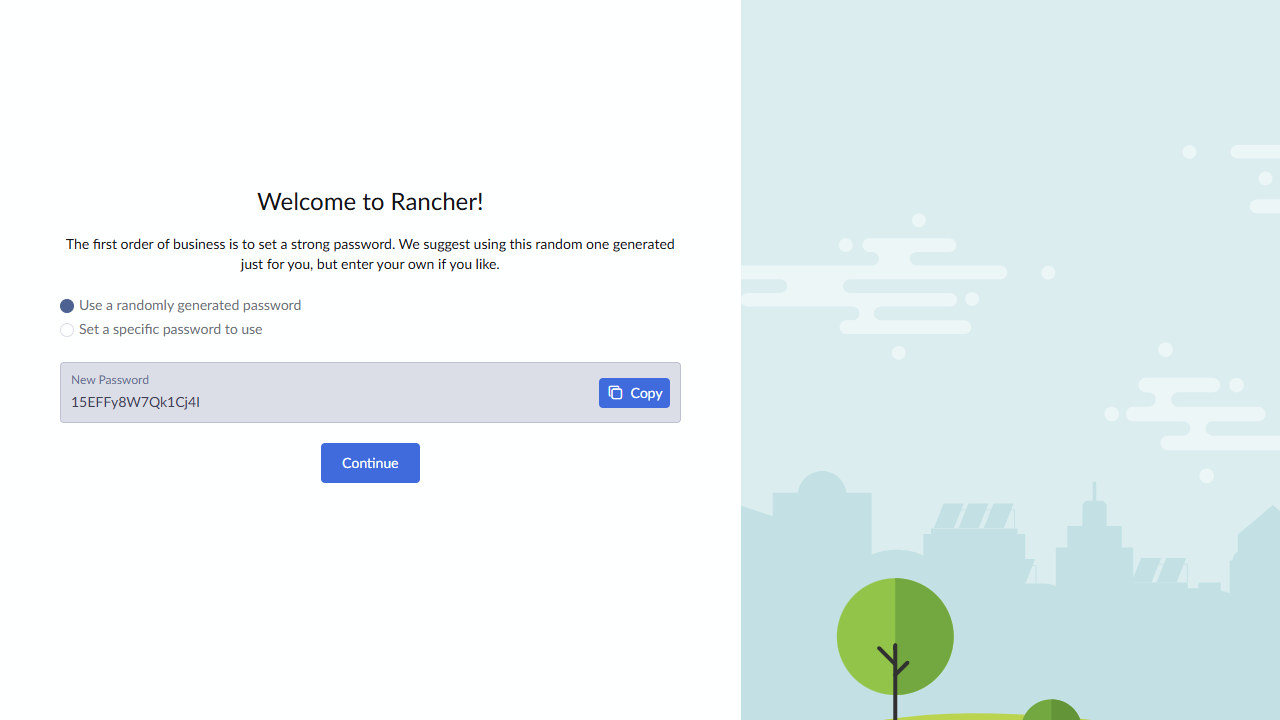
Open https://rancher.local, accept the self-signed certificate warning, and use admin / admin. Rancher forces a password change on the first screen. Set a password of your choice; on the next screen, set the Server URL to https://rancher.local, not https://localhost:8443, so downstream cluster agents can reach Rancher.
The login screen looks like this:
After entering the bootstrap credentials, Rancher asks for a new password and the Server URL:
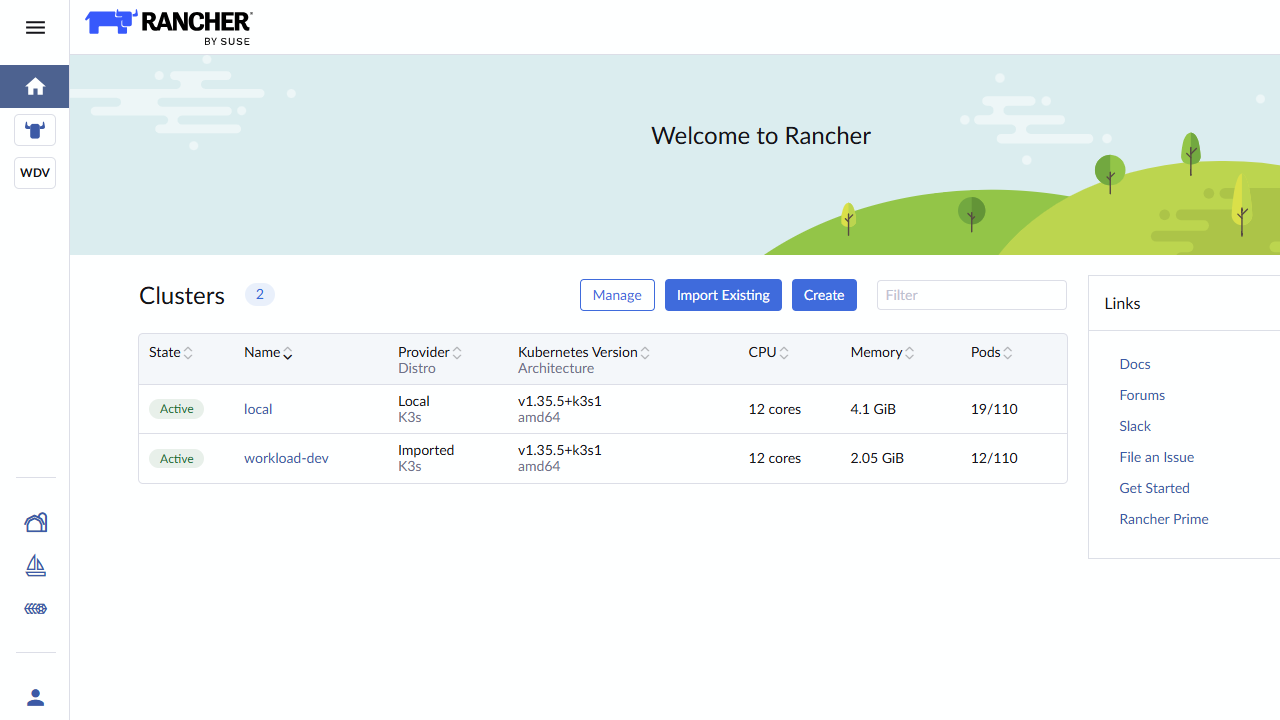
After login the dashboard shows the local cluster (the cluster Rancher itself runs on):
4. Create the workload cluster
Create the second k3d cluster with no inbound port mappings. It does not need them because the agent inside it connects outbound to Rancher.
./scripts/setup-workload-cluster.sh
kubectl config use-context k3d-workload-dev
kubectl get nodes
# NAME                        STATUS   ROLES                  AGE   VERSION
# k3d-workload-dev-server-0   Ready    control-plane,master   30s   v1.35.5+k3s1
5. Import workload-dev from the UI
In Rancher: Cluster Management → Import Existing → Generic. Name the cluster workload-dev and click Create. The UI shows a kubectl apply -f https://rancher.local/v3/import/<token>.yaml command.
Run that command while your context is k3d-workload-dev:
kubectl config use-context k3d-workload-dev
kubectl apply -f https://rancher.local/v3/import/<token>.yaml
The cattle-cluster-agent pod starts in workload-dev's cattle-system namespace. It downloads the rancher/rancher-agent:v2.15.0 image; if your network is slow, pre-pull it in Docker Desktop and import it:
docker pull rancher/rancher-agent:v2.15.0
k3d image import rancher/rancher-agent:v2.15.0 -c workload-dev
After the agent connects, both clusters show Active in Cluster Management:
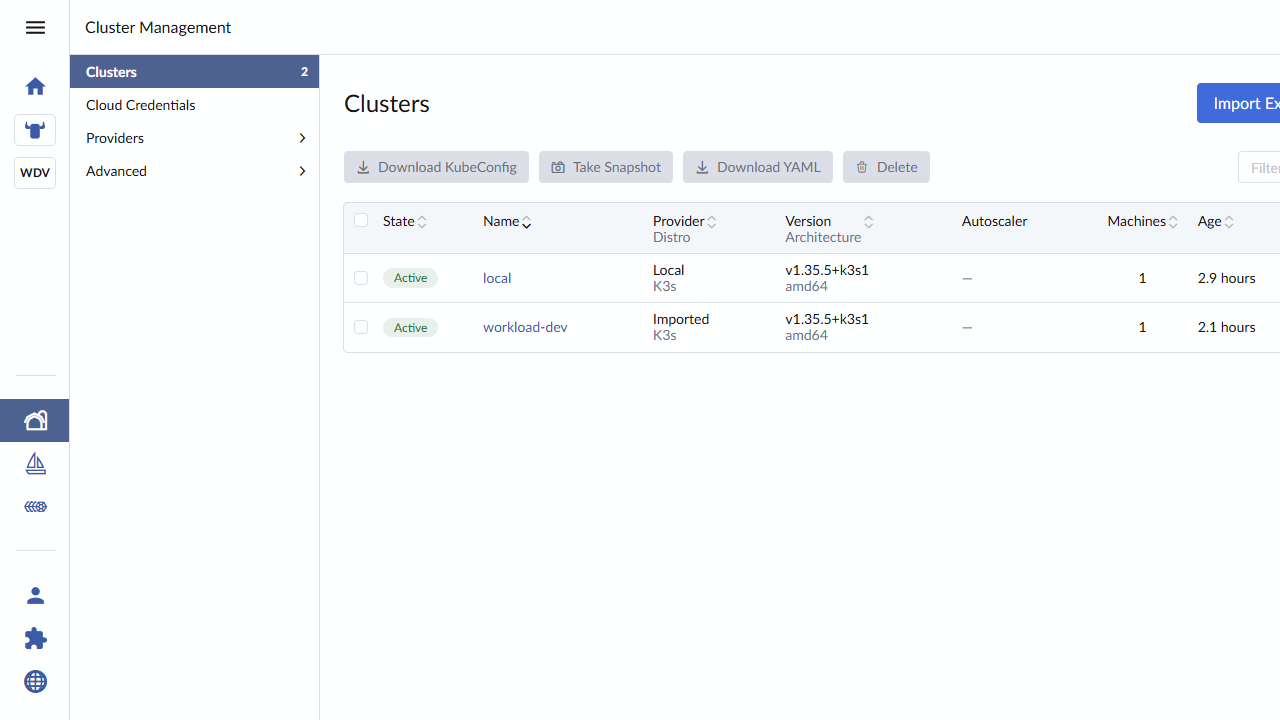
The list shows the provider type: local is a Local K3s cluster because Rancher itself runs there, while workload-dev is an Imported K3s cluster. That single table is the management plane in one picture: one URL, two clusters, one state.
6. Build and import the demo image
The sample app is the same .NET 10 Minimal API from the previous article, a full CRUD todo service backed by PostgreSQL and RabbitMQ. Build it locally and import the image into both clusters (there is no registry in this demo).
cd rancher-multi-cluster-setup
docker build -t dotnet-k8s-setup:latest .
k3d image import dotnet-k8s-setup:latest -c rancher-mgmt
k3d image import dotnet-k8s-setup:latest -c workload-dev
If
docker buildfails with a NuGet timeout, retry. The sample uses a multi-stage .NET 10 Alpine Dockerfile and publishes the app for the target architecture.
7. Deploy the app on both clusters
The Fleet GitRepo in k8s/fleet-gitrepo.yaml points at https://github.com/mehdihadeli/devops-samples path rancher-multi-cluster-setup/k8s/app. The manifests there include the todo API deployment, PostgreSQL, RabbitMQ, a ConfigMap, and a Secret: the full stack from the previous article, now delivered by Fleet. Once that repository contains the sample, Fleet will roll the manifests out to every registered cluster automatically:
kubectl config use-context k3d-rancher-mgmt
kubectl apply -f k8s/fleet-gitrepo.yaml
Until the path exists in the remote repository, Fleet reports no resource found at the following paths. For local testing before publication, apply the manifests directly:
kubectl --context k3d-rancher-mgmt apply -f k8s/app/
kubectl --context k3d-workload-dev apply -f k8s/app/
After applying, three todo-app pods run alongside Postgres and RabbitMQ pods on each cluster. To see them, click Explore next to the local cluster in Cluster Management, then open Workloads → Pods and select the dotnet-k8s namespace from the namespace filter at the top:
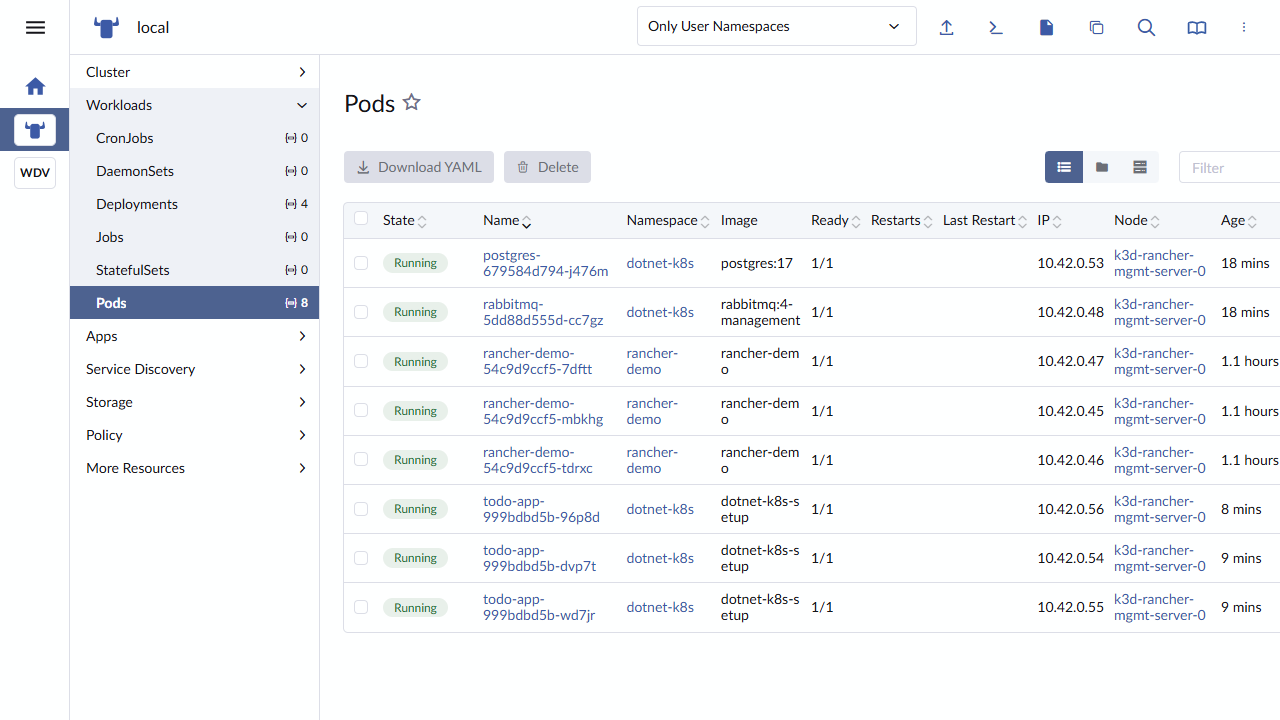
The namespace filter is the small dropdown at the top of the page. Selecting dotnet-k8s hides every other namespace and shows only the project workloads. The same view on workload-dev looks identical because Rancher talks to both clusters through the same Kubernetes API:
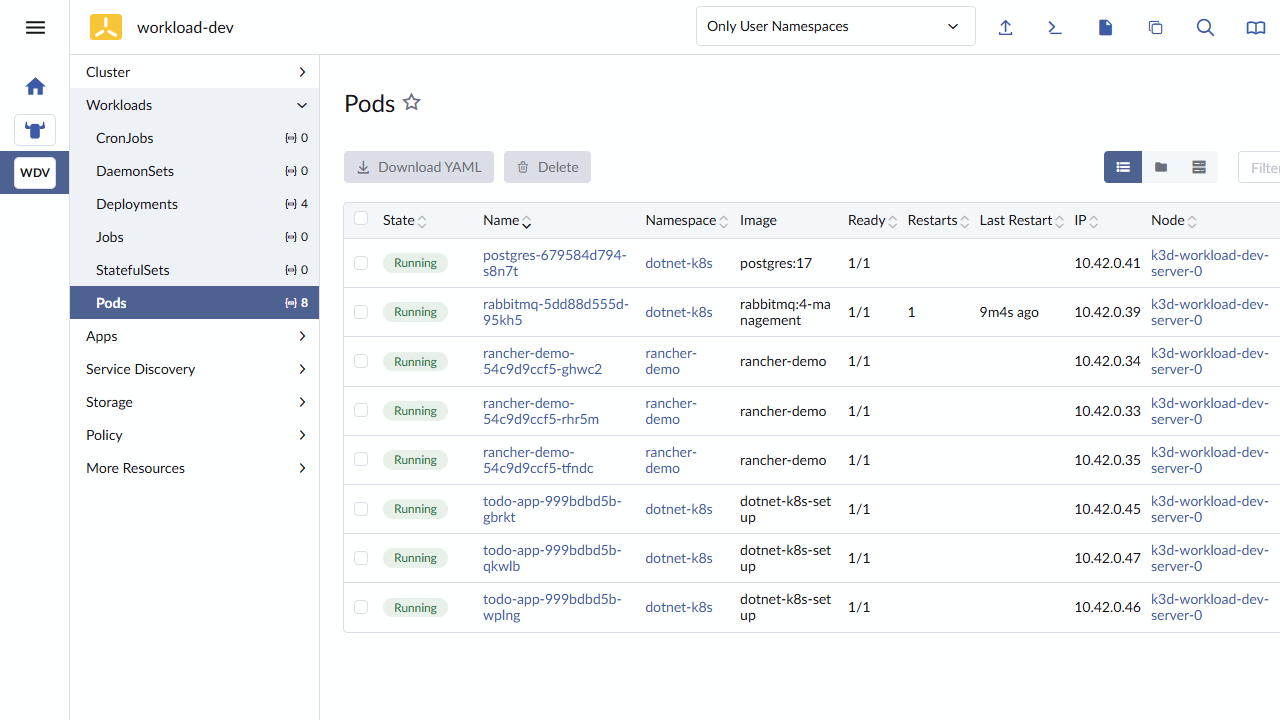
Both tables show the same five pods: three todo-app replicas, one postgres, and one rabbitmq. That is the multi-cluster management payoff: the same app, the same backing services, the same UI, on two different clusters.
The workload-dev cluster also shows the Rancher-managed deployment, service, PostgreSQL, RabbitMQ, and cluster storage classes. These are ordinary Kubernetes resources; Rancher just surfaces them from the imported cluster. Open Workloads → Deployments with the dotnet-k8s namespace selected:
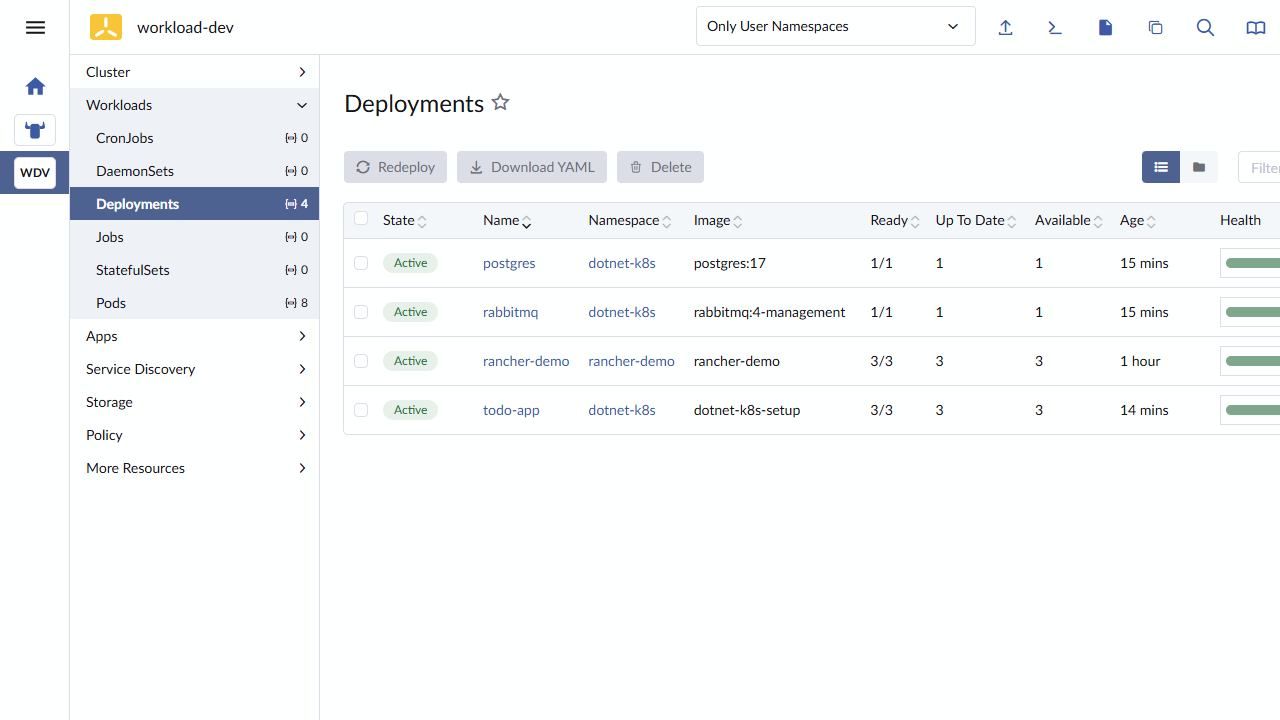
The deployments table shows the three controllers from our manifests: postgres (1 replica), rabbitmq (1 replica), and todo-app (3 replicas). Each row is the same object you would see with kubectl -n dotnet-k8s get deployments.
Next, Service Discovery → Services:
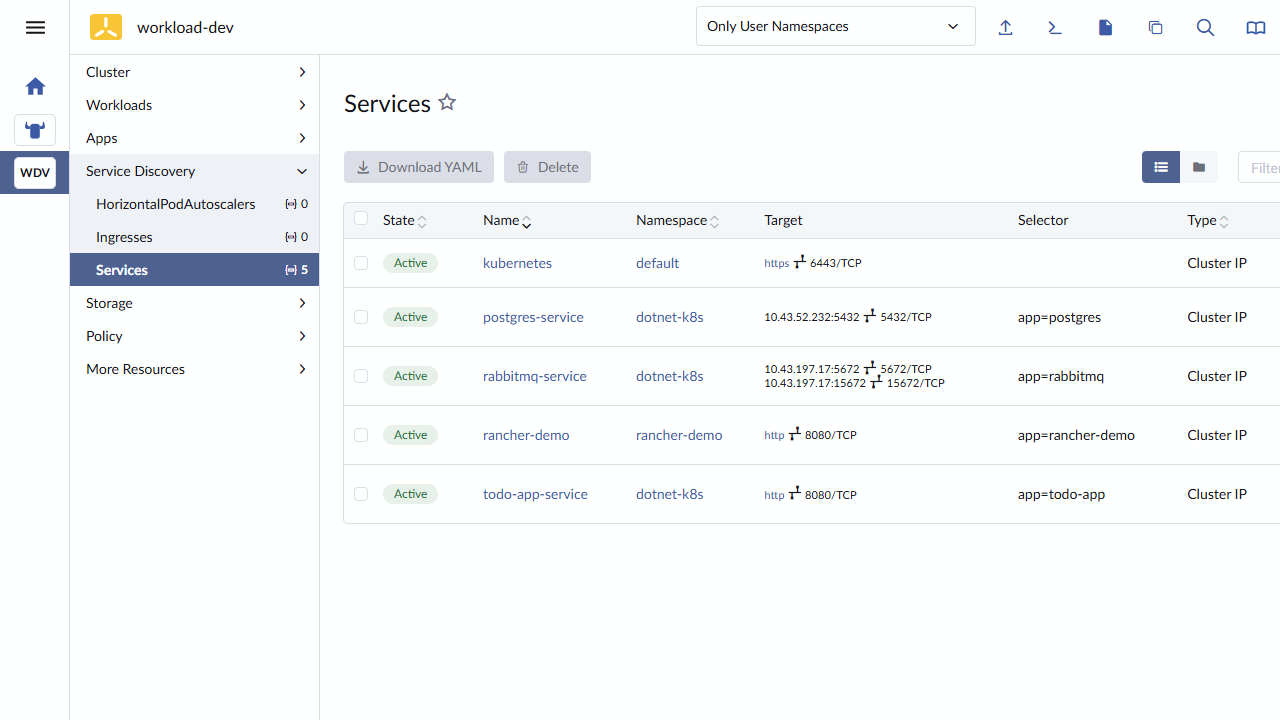
The services expose the app on port 80 (todo-app-service), Postgres on port 5432 (postgres-service), and RabbitMQ on ports 5672 and 15672 (rabbitmq-service). ClusterIP services live inside the cluster, but Rancher displays them alongside the deployments so you do not have to switch tools.
The ConfigMap that overrides appsettings.json appears under Storage → ConfigMaps:
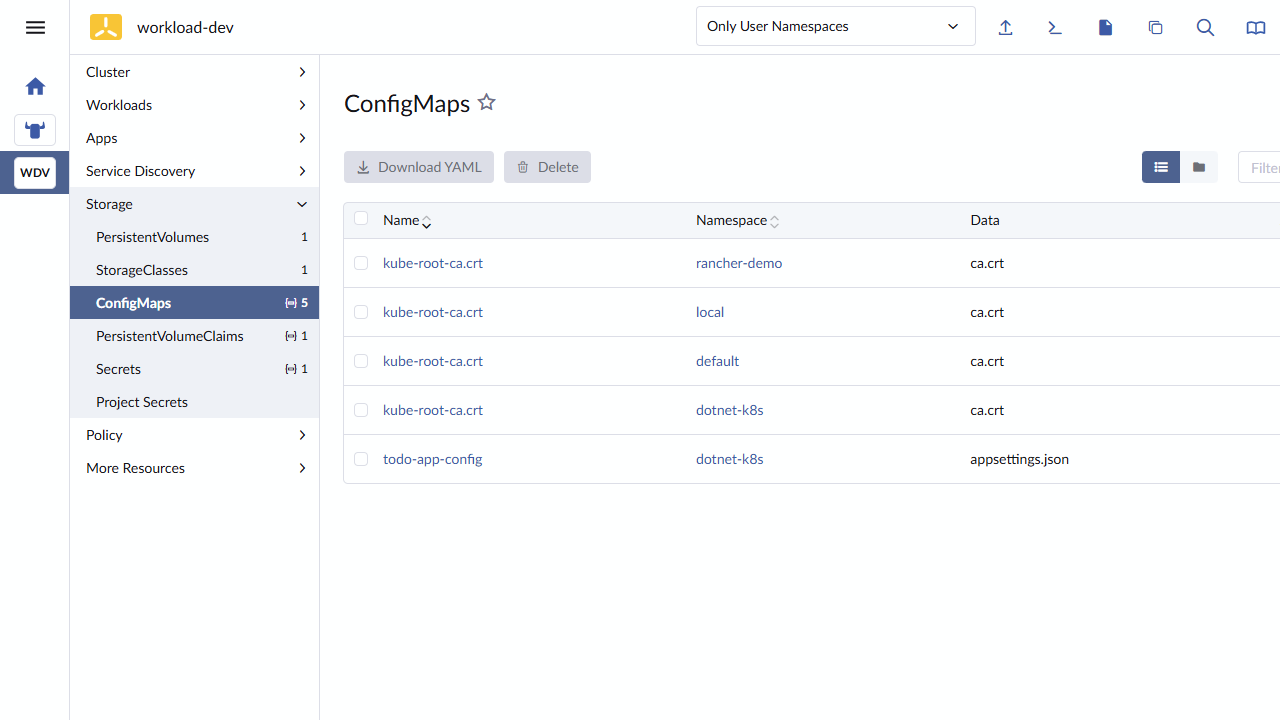
Because the deployment mounts this ConfigMap at /app/appsettings.json, the QueueName setting is picked up by the app at runtime without a code change.
Postgres persistence comes from a PersistentVolumeClaim in postgres.yaml. Open Storage → PersistentVolumeClaims:
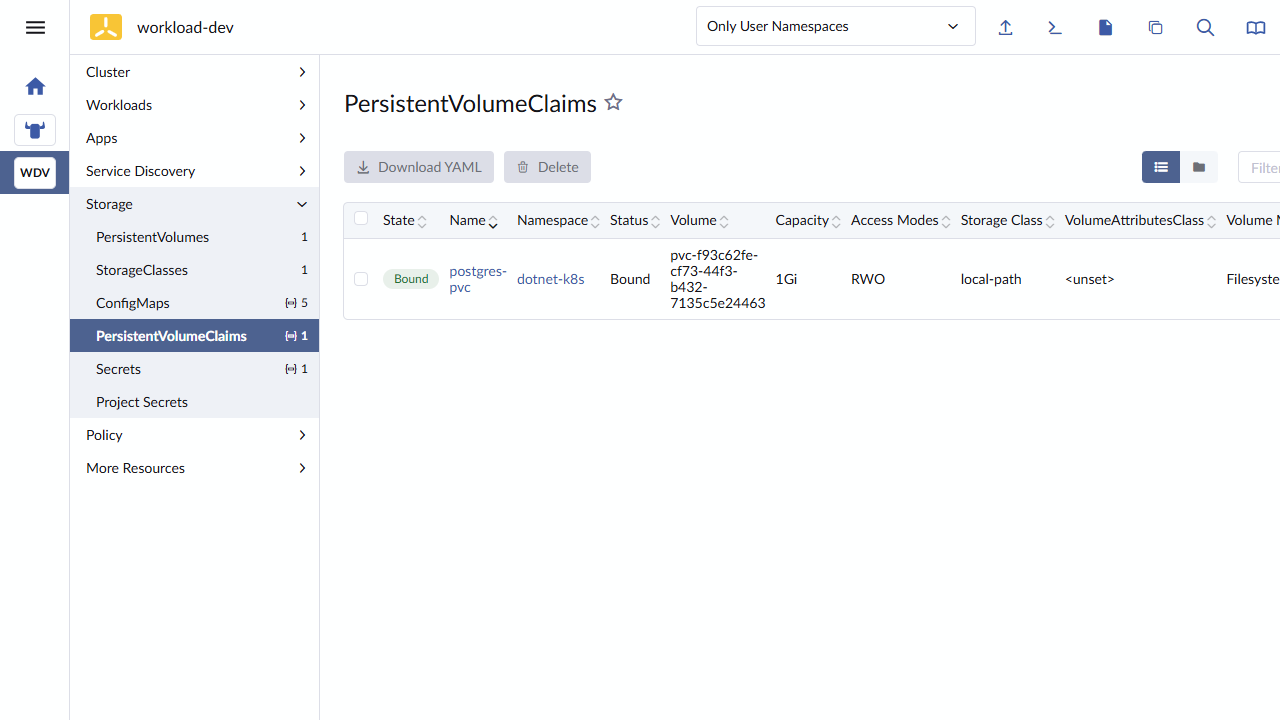
The postgres-pvc claim requests 1 Gi from the cluster's default storage class. That storage class is shown under Storage → StorageClasses:
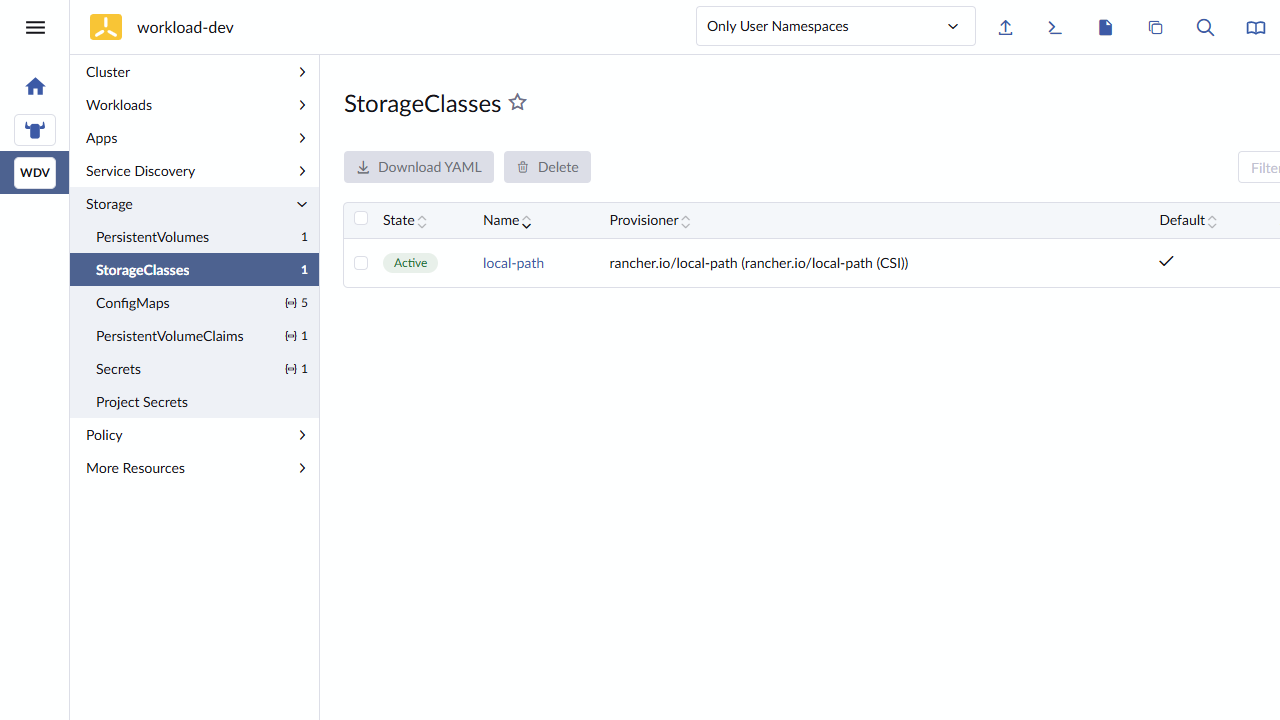
local-path is k3s' built-in provisioner; it creates a hostPath-backed volume on the node. For a laptop demo it is perfect, and for production you would replace it with a CSI driver appropriate to your cloud or data center.
The Secret that holds the Postgres and RabbitMQ connection strings appears under Storage → Secrets:
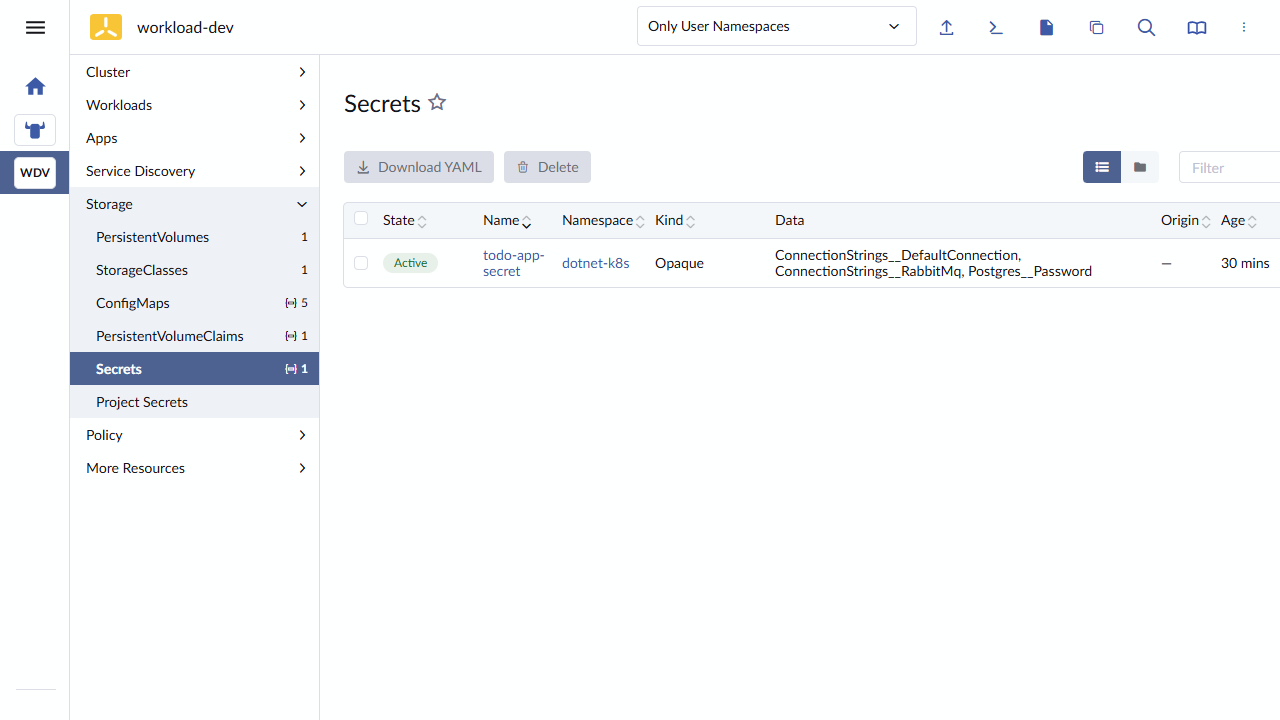
Rancher displays the keys but not the decoded values; the same stringData you wrote in secret.yaml is stored as base64 in etcd. The deployment injects these keys as environment variables, and .NET Configuration maps ConnectionStrings__DefaultConnection to ConnectionStrings:DefaultConnection automatically.
For external traffic, the sample also ships an Ingress and a Gateway API manifest. Keep in mind that the Kubernetes Gateway API is an official Kubernetes standard, independent of Envoy, nginx, or any specific product. The spec defines the resources, but a cluster still needs a conformant controller to actually implement them. Envoy Gateway is one such controller; nginx Gateway Fabric, Istio, Contour, and Cilium Gateway API are others. You do not remove Ingress to use Gateway API. The two APIs can live in the same cluster, and this sample uses both side by side.
Each object has a single, well-defined job:
- Ingress tells an ingress controller how to route HTTP traffic from outside the cluster into a Service. It is the classic Kubernetes way to expose HTTP/HTTPS apps through one shared load balancer.
- GatewayClass names the controller that will implement Gateway resources. It is the "which implementation" knob: Envoy Gateway, NGINX Gateway Fabric, or any other conformant controller.
- Gateway owns the listener configuration: protocol, port, TLS. It is the data-plane entry point, while the routing rules live elsewhere.
- HTTPRoute attaches to a Gateway and defines path-based routing rules. It replaces the
rulesandpathspart of an Ingress and can do more, such as traffic splitting.
The Ingress is the classic networking.k8s.io/v1 resource:
Source: k8s/app/ingress.yaml
# Ingress — classic HTTP routing for the todo API.
# Requires an ingress controller (ingress-nginx in this sample).
#
# On k3d, the controller runs with hostNetwork=true so it binds ports 80/443
# on the node. Add this host to your hosts file:
#   127.0.0.1 todo-app.local
#
# On bare-metal with MetalLB, the controller Service becomes type LoadBalancer
# and MetalLB assigns it a LAN IP; point your DNS at that IP instead.
apiVersion: networking.k8s.io/v1
kind: Ingress
metadata:
  name: todo-app-ingress
  namespace: dotnet-k8s
  annotations:
    nginx.ingress.kubernetes.io/rewrite-target: /
spec:
  ingressClassName: nginx
  rules:
    - host: todo-app.local
      http:
        paths:
          - path: /
            pathType: Prefix
            backend:
              service:
                name: todo-app-service
                port:
                  number: 80
Focus here: the useful part of this file is not only the Ingress object. The comments encode the environment assumption: on k3d the ingress controller owns the host network, while on bare metal you keep the same Ingress object and move the exposure concern to the controller service plus MetalLB.
todo-app-ingress tells the ingress-nginx controller: when a request arrives with Host: todo-app.local, forward it to todo-app-service on port 80. The rewrite-target annotation keeps path handling predictable. On k3d, add 127.0.0.1 todo-app.local to your hosts file and the ingress controller routes traffic to the app. On bare metal with MetalLB, the controller Service becomes type: LoadBalancer, MetalLB assigns it a LAN IP, and you point DNS at that IP instead. The Ingress object itself does not change.
The Kubernetes Gateway API version splits the same job into the three resources listed above:
Source: k8s/app/gateway-api.yaml
# =============================================================================
# Kubernetes Gateway API — the upstream standard API for service networking.
# Docs: https://kubernetes.io/docs/concepts/services-networking/gateway/
#
# This manifest uses Envoy Gateway as the controller, but the GatewayClass,
# Gateway, and HTTPRoute resources are standard gateway.networking.k8s.io/v1
# objects and will work with any conformant Gateway API implementation.
#
# Requires a Gateway API controller. This sample uses Envoy Gateway:
#   helm install eg oci://docker.io/envoyproxy/gateway-helm \
#     --namespace envoy-gateway-system --create-namespace \
#     --wait --timeout 4m
#
# NOTE (k3d / hostNetwork conflict): Envoy Gateway's data plane Service is
# type LoadBalancer by default, and k3s' svclb DaemonSet then claims the host
# ports 80/443 that the hostNetwork ingress-nginx controller needs.
---
apiVersion: gateway.networking.k8s.io/v1
kind: GatewayClass
metadata:
  name: nginx-gateway-class
spec:
  controllerName: gateway.envoyproxy.io/gatewayclass-controller
---
apiVersion: gateway.networking.k8s.io/v1
kind: Gateway
metadata:
  name: todo-app-gateway
  namespace: dotnet-k8s
spec:
  gatewayClassName: nginx-gateway-class
  listeners:
    - name: http
      protocol: HTTP
      port: 80
      allowedRoutes:
        namespaces:
          from: Same
---
apiVersion: gateway.networking.k8s.io/v1
kind: HTTPRoute
metadata:
  name: todo-app-route
  namespace: dotnet-k8s
spec:
  parentRefs:
    - name: todo-app-gateway
  rules:
    - matches:
        - path:
            type: PathPrefix
            value: /todos
      backendRefs:
        - name: todo-app-service
          port: 80
Focus here: this file carries one operational detail the shorter article version hid. On k3d, Envoy Gateway's default LoadBalancer service can collide with ingress-nginx's hostNetwork claim on ports 80/443, so the sample documents that local-only constraint directly in the manifest comments.
nginx-gateway-classselects Envoy Gateway as the controller throughcontrollerName.todo-app-gatewayopens an HTTP listener on port 80 and only allows routes from the same namespace (from: Same).todo-app-routematches the/todosprefix and forwards totodo-app-serviceon port 80.
The live view under Service Discovery → Ingresses shows the Ingress object:
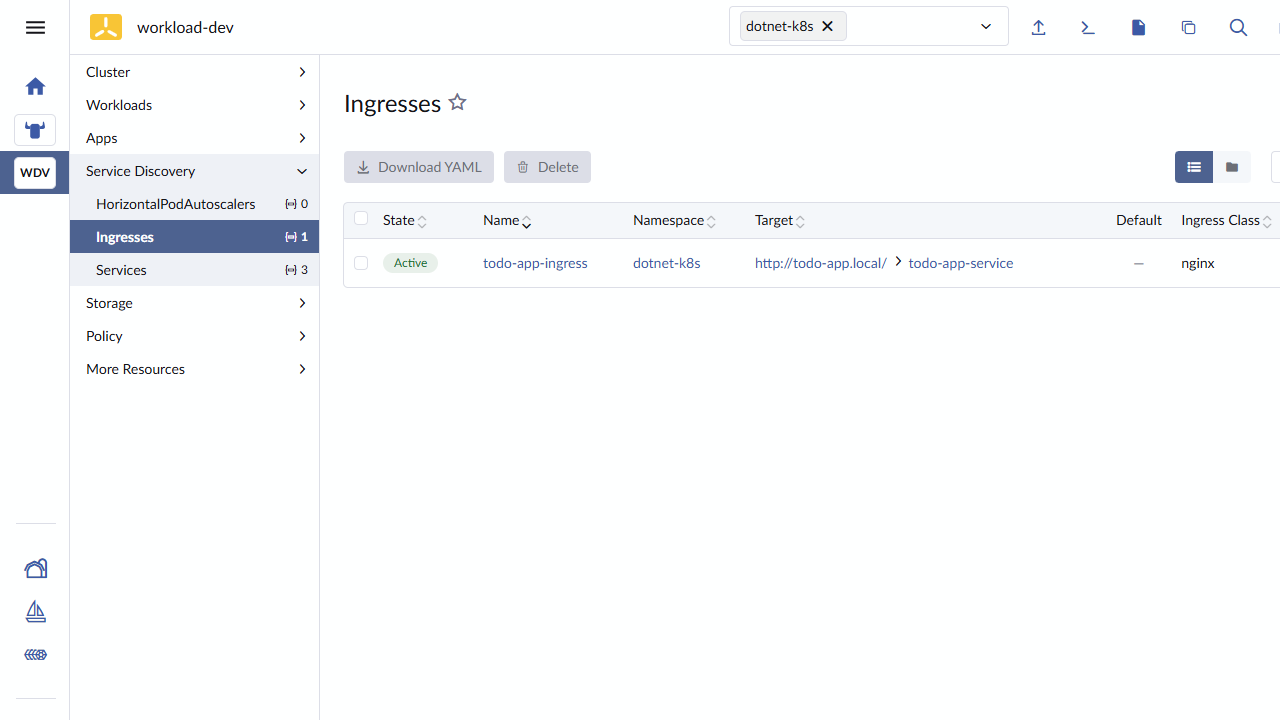
Recommended addition from the field. When you import a cluster that already has an ingress controller, Rancher does not force you to replace it. The Ingress tab simply lists whatever
networking.k8s.io/v1resources exist in the selected namespace. That means you can keep cluster-specific ingress controllers while still centralizing visibility. A cloud cluster with an ALB ingress class and an on-prem cluster with ingress-nginx both appear in the same UI.
The Gateway object is shown under Service Discovery → Gateways:
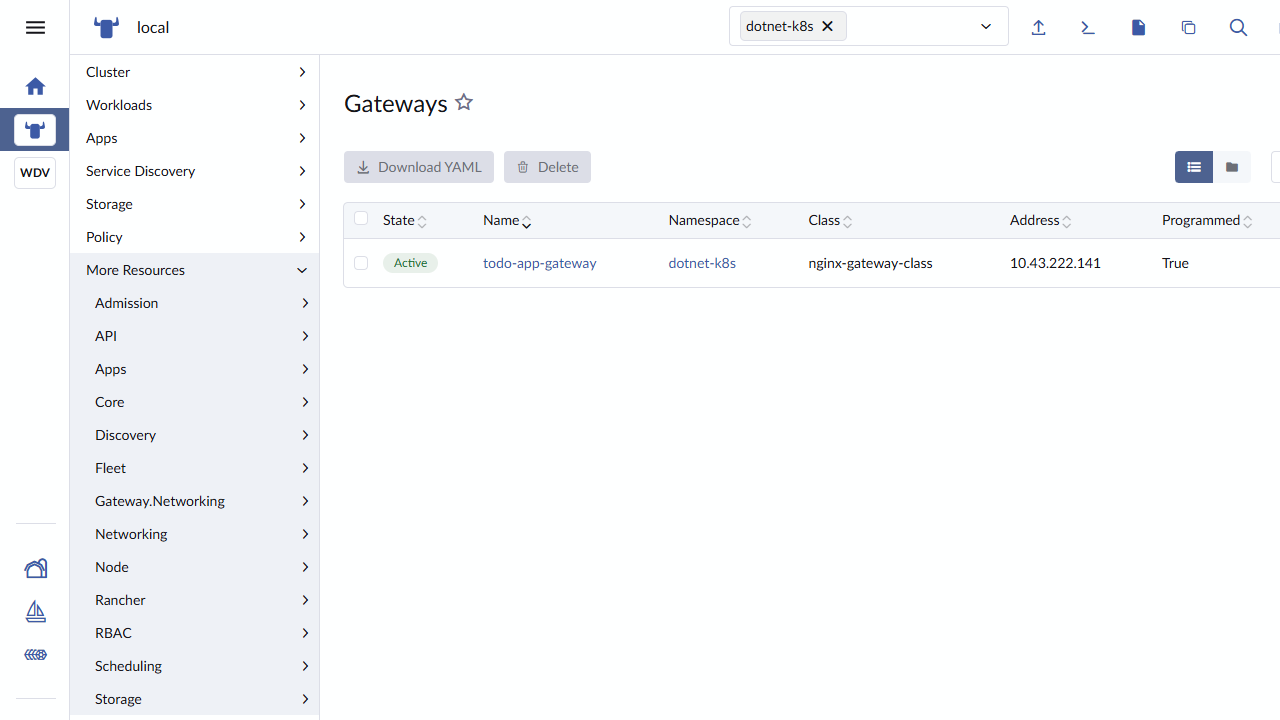
The table shows the todo-app-gateway is accepted and programmed by the GatewayClass controller. The address column tells you where the data plane is listening. On k3d this is an in-cluster address; on bare metal with a LoadBalancer-backed GatewayClass it would be the external IP.
The routing rule itself lives in the HTTPRoute:
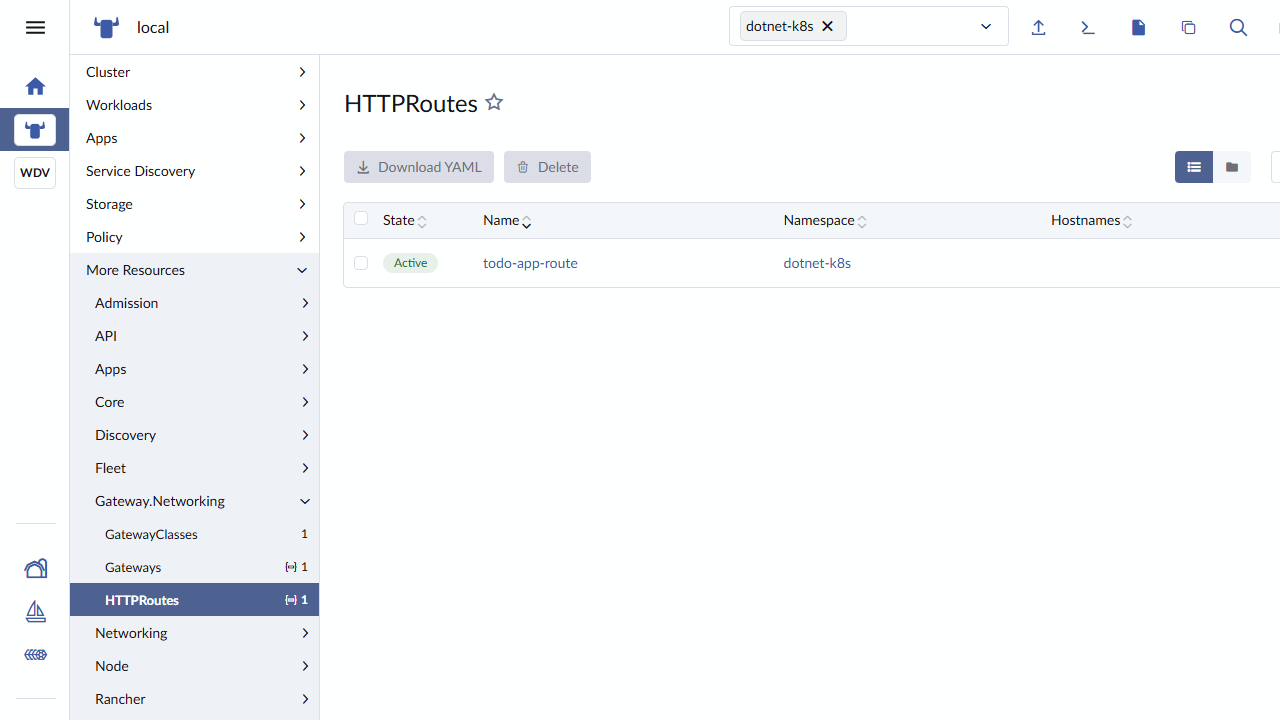
todo-app-route matches the /todos prefix and sends traffic to todo-app-service on port 80. The HTTPRoute is the resource that replaces the Ingress rules and paths; the Gateway only owns the listener configuration.
A third manifest, gateway-api-canary.yaml, shows a traffic split that Ingress cannot express natively:
Source: k8s/app/gateway-api-canary.yaml
# =============================================================================
# Kubernetes Gateway API — canary traffic split (10% to v2, 90% to v1).
#
# A capability Ingress cannot express natively. The `weight` field is part of
# the Gateway API spec, so no controller annotations or service mesh needed.
#
# Apply with: kubectl apply -f k8s/app/gateway-api-canary.yaml
# (creates todo-app-service-v2 first, or points at any existing backend)
# Docs: https://kubernetes.io/docs/concepts/services-networking/gateway/
# =============================================================================
apiVersion: gateway.networking.k8s.io/v1
kind: HTTPRoute
metadata:
  name: todo-app-canary
  namespace: dotnet-k8s
spec:
  parentRefs:
    - name: todo-app-gateway
  rules:
    - backendRefs:
        - name: todo-app-service-v2
          port: 80
          weight: 10
        - name: todo-app-service
          port: 80
          weight: 90
The weight fields split traffic 10% to todo-app-service-v2 and 90% to the original service, expressed entirely in Gateway API with no annotations and no service mesh. Apply it only after you create the todo-app-service-v2 backend.
For a deeper look at the Ingress versus Gateway API decision, including MetalLB on bare metal, see the previous article. This article focuses on Rancher management; that article focuses on the traffic layer.
8. Verify the API per cluster
Port-forward the service on each cluster and call the /todos endpoint. The response confirms the API is backed by PostgreSQL and answering from both clusters:
# On rancher-mgmt
kubectl config use-context k3d-rancher-mgmt
kubectl port-forward -n dotnet-k8s svc/todo-app-service 8081:80 &
curl -s http://localhost:8081/todos
# []

# Create a todo to prove the database works
curl -s -X POST http://localhost:8081/todos \
  -H "Content-Type: application/json" \
  -d '{"title":"Hello from rancher-mgmt"}'

# On workload-dev
kubectl config use-context k3d-workload-dev
kubectl port-forward -n dotnet-k8s svc/todo-app-service 8082:80 &
curl -s http://localhost:8082/todos
# []

curl -s -X POST http://localhost:8082/todos \
  -H "Content-Type: application/json" \
  -d '{"title":"Hello from workload-dev"}'
That completes the live walkthrough. The sections below explain why each step works.
Install Rancher on k3d
Step 1: Create the cluster
The cluster script in the sample is deliberately short. k3d does the heavy lifting. The two flags that matter are the memory bump and the Traefik disable:
Source: scripts/setup-cluster.sh
#!/usr/bin/env bash
set -euo pipefail

CLUSTER_NAME="rancher-mgmt"

info()  { printf "  ⓘ  %s\n" "$*"; }
ok()    { printf "  ✔  %s\n" "$*"; }
fail()  { printf "  ✘  %s\n" "$*"; exit 1; }
step()  { printf "\n━━━━━━━━━━━━━━━━━━━━━━━━━━━━━━━━━━━━━━━━━━━━━━━━━━━━\n  %s\n━━━━━━━━━━━━━━━━━━━━━━━━━━━━━━━━━━━━━━━━━━━━━━━━━━━━\n\n" "$*"; }

step "2/3  Creating k3d cluster '$CLUSTER_NAME'"

if k3d cluster list 2>/dev/null | grep -q "^$CLUSTER_NAME"; then
  info "Cluster '$CLUSTER_NAME' already exists. Deleting..."
  k3d cluster delete "$CLUSTER_NAME"
fi

k3d cluster create "$CLUSTER_NAME" \
  --servers 1 \
  --servers-memory 4g \
  -p "80:80@loadbalancer" \
  -p "443:443@loadbalancer" \
  --k3s-arg "--disable=traefik@server:0"

ok "Cluster '$CLUSTER_NAME' created"
Focus here: the script recreates the cluster idempotently, gives Rancher the 4 GB server node it expects, and disables Traefik so Rancher's ingress-nginx can own ports 80/443. The full file also handles prerequisite checks and local kubeconfig normalization for Windows-friendly access.
The port mappings make the Rancher UI reachable at http://localhost and https://localhost. The --k3s-arg flag disables Traefik, which k3s installs by default; leaving it enabled would start a fight over ports 80 and 443 the moment ingress-nginx comes up. We install ingress-nginx ourselves in setup-rancher.sh so we can run it with hostNetwork, exactly the same trick the previous article uses.
Step 2: cert-manager and the Rancher chart
Rancher is installed as a Helm chart from Rancher's own chart repository. The sample keeps the whole installation flow in one script so the prerequisites, cert-manager install, Rancher chart, ingress-nginx, patch, and /ping verification stay together:
Source: scripts/setup-rancher.sh
#!/usr/bin/env bash
set -euo pipefail

CLUSTER_NAME="rancher-mgmt"
HOSTNAME="${1:-rancher.local}"
BOOTSTRAP_PASSWORD="${BOOTSTRAP_PASSWORD:-admin}"
CERT_MANAGER_VERSION="${CERT_MANAGER_VERSION:-v1.16.3}"

step "0/4  Checking preconditions"

kubectl config current-context | grep -q "k3d-$CLUSTER_NAME" \
  || fail "Current context is not k3d-$CLUSTER_NAME. Run ./scripts/setup-cluster.sh first."

kubectl get nodes >/dev/null 2>&1 \
  || fail "Cannot reach the cluster. Is k3d-$CLUSTER_NAME running?"

step "1/4  Installing cert-manager ($CERT_MANAGER_VERSION)"

helm repo add jetstack https://charts.jetstack.io --force-update >/dev/null 2>&1
helm repo update >/dev/null 2>&1 || true

helm upgrade --install cert-manager jetstack/cert-manager \
  --namespace cert-manager \
  --create-namespace \
  --version "$CERT_MANAGER_VERSION" \
  --set crds.enabled=true \
  --wait \
  --timeout 4m

step "2/4  Installing Rancher Manager (hostname: $HOSTNAME)"

helm upgrade --install rancher rancher-latest/rancher \
  --namespace cattle-system \
  --create-namespace \
  --set hostname="$HOSTNAME" \
  --set bootstrapPassword="$BOOTSTRAP_PASSWORD" \
  --set replicas=1 \
  --wait \
  --timeout 15m

helm repo add ingress-nginx https://kubernetes.github.io/ingress-nginx >/dev/null 2>&1
helm repo update >/dev/null 2>&1 || true
helm upgrade --install ingress-nginx ingress-nginx/ingress-nginx \
  --namespace ingress-nginx \
  --create-namespace \
  --set controller.hostNetwork=true \
  --set controller.dnsPolicy=ClusterFirstWithHostNet \
  --set controller.service.type=ClusterIP \
  --set controller.publishService.enabled=false \
  --wait \
  --timeout 4m

kubectl rollout status deployment/rancher -n cattle-system --timeout=300s
kubectl rollout status deployment/ingress-nginx-controller -n ingress-nginx --timeout=180s

kubectl -n cattle-system patch ingress rancher --type='json' \
  -p='[{"op":"add","path":"/spec/ingressClassName","value":"nginx"}]' \
  >/dev/null 2>&1 || true

step "3/4  Verifying the ingress path"

until curl -kfsS "https://$HOSTNAME/ping" >/dev/null 2>&1; do
  info "Waiting for https://$HOSTNAME/ping ..."
  sleep 5
done
Focus here: crds.enabled=true handles cert-manager CRDs, Rancher stays at one replica for a laptop install, ingress-nginx binds directly to the node with hostNetwork=true, Rancher Ingress is patched to the nginx class, and the script refuses to finish until https://rancher.local/ping returns successfully.
Three settings do the interesting work:
hostname=rancher.local. The UI must be reachable under a hostname Rancher knows. This sample uses a local-only hostname so the demo works without internet DNS. Add127.0.0.1 rancher.localto your hosts file before opening the UI.bootstrapPassword=admin. The temporary admin password. Rancher forces a real password change on first login.replicas=1. A single-replica install. Defaults to three for HA; on a laptop one is enough.
The Rancher chart creates an Ingress, but it does not install an ingress controller. That is why the script also installs ingress-nginx with hostNetwork=true and patches the Rancher Ingress to ingressClassName: nginx in the same flow.
Step 3: First login
Wait for the rollout, then open the URL and accept the self-signed certificate warning (expected, since the cert comes from cert-manager rather than a public CA). Add 127.0.0.1 rancher.local to your hosts file first:
kubectl -n cattle-system rollout status deploy/rancher
kubectl -n ingress-nginx rollout status deploy/ingress-nginx-controller
# open https://rancher.local  (admin / admin, then change the password)
You land on a cluster dashboard with one cluster already listed: local.
Why rancher.local instead of localhost?
Rancher requires a hostname. The Helm chart uses it for the ingress Host header, cert-manager issues a TLS certificate for it, and Rancher stores it as the Server URL that every downstream cluster agent uses to phone home. The choice of hostname matters once you leave single-cluster mode.
localhost works for browsing the UI from the same machine, but it is the wrong Server URL for multi-cluster import. Inside the workload-dev cluster, localhost means the workload-dev node itself, not the laptop running Rancher. The cattle-cluster-agent installed there would try to connect to itself and fail. A real hostname that resolves back to the Rancher ingress fixes this.
This sample uses rancher.local because it is fully local and works without internet DNS. After adding 127.0.0.1 rancher.local to your hosts file, both your browser and the k3d clusters can resolve it. k3d containers run on the same Docker Desktop network as the host, so they reach rancher.local at the host IP where the ingress listens.
If you only want to explore the UI on one cluster, https://localhost:8443 through a port-forward is simpler and perfectly fine. For the multi-cluster and Fleet demo, use rancher.local.
The local Cluster: Rancher Manages Itself
The first cluster you see after login is local, and it is the cluster Rancher itself is running on. Rancher imports it automatically during installation. This is the purest statement of the management-plane model: Rancher is not a standalone appliance, it is a tenant of the very cluster it manages.
%%{init: {
  'theme': 'base',
  'themeVariables': {
    'background': '#ffffff',
    'primaryColor': '#ffffff',
    'primaryTextColor': '#2c3e50',
    'primaryBorderColor': '#bdc3c7',
    'lineColor': '#34495e',
    'secondaryColor': '#f8f9fa',
    'tertiaryColor': '#f1f3f5',
    'fontFamily': 'Segoe UI, Arial, sans-serif',
    'fontSize': '14px',
    'edgeLabelBackground': '#ffffff',
    'nodeBorder': '2px',
    'mainBkg': '#ffffff',
    'nodePadding': '12px',
    'subGraphBkg': '#fafbfc',
    'subGraphBorder': '#dfe6e9'
  }
}}%%
flowchart TB
    classDef infra fill:#f3e5f5,stroke:#8e24aa,color:#4a148c
    classDef compute fill:#e3f2fd,stroke:#1565c0,color:#0d47a1
    classDef gateway fill:#e8eaf6,stroke:#3949ab,color:#1a237e

    Rancher["Rancher Manager<br/>(cattle-system)"]:::infra
    Local["local cluster"]:::gateway

    Rancher -->|"imports itself"| Local
    Local -->|"runs the Rancher pods"| Rancher
    Local -->|"also runs workloads"| App["dotnet-k8s pods<br/>+ Postgres + RabbitMQ"]:::compute
The practical consequence: any workload you deploy into local shares the laptop's k3d cluster with Rancher itself. That is fine for a demo. Rancher's pods are modest once running, and it is the cheapest possible way to learn, because there is no second machine anywhere.
Projects vs Namespaces
Plain Kubernetes organizes with namespaces. Rancher adds one layer on top: the project, a group of namespaces that share RBAC and resource quotas. Think of it as the unit of team.
| Concept | Kubernetes | Rancher |
|---|---|---|
| Scope | Namespace | Project = group of namespaces |
| RBAC grant | Per namespace, per role binding | One project role covers all its namespaces |
| Quota | ResourceQuota per namespace | Project-level quota |
| Who sees it | Whoever has the role binding | Members of the project |
In the UI, the demo creates project team-a and, inside it, the namespace dotnet-k8s:
- Open the
localcluster, then Projects/Namespaces. - Create Project, name it
team-a. - Inside
team-a, Create Namespace, name itdotnet-k8s.
A namespace always belongs to exactly one project. From Kubernetes' point of view nothing special happened: dotnet-k8s is a normal namespace. From Rancher's point of view it is now scoped to a team, with a natural place to attach roles and quotas.
Deploy the .NET App Without kubectl
The demo app is the same .NET 10 todo API from the previous article: full CRUD for todo items, backed by PostgreSQL for persistence and RabbitMQ for event publishing. Deploying it through Rancher instead of kubectl proves two things at once: the management plane works with real multi-service apps, not just hello-world endpoints, and the YAML Rancher sends to the cluster is exactly the same YAML you would kubectl apply yourself:
Source: App/DotnetK8sSetup/Program.cs
using DotnetK8sSetup.Features.Todos;
using DotnetK8sSetup.Infrastructure.RabbitMq;
using Microsoft.EntityFrameworkCore;

var builder = WebApplication.CreateBuilder(args);

// Add services to the container.
// Learn more about configuring OpenAPI at https://aka.ms/aspnet/openapi
builder.Services.AddOpenApi();

builder.Services.AddDbContext<TodoDbContext>(options =>
  options.UseNpgsql(builder.Configuration.GetConnectionString("DefaultConnection"))
);

// RabbitMQ — single connection shared by all publishers.
// The connection string comes from ConnectionStrings:RabbitMq, injected via
// envFrom (Secret) in Kubernetes, falling back to appsettings.json locally.
builder.Services.AddSingleton(_ => new RabbitMqConnection(
  builder.Configuration.GetConnectionString("RabbitMq")!
));

var app = builder.Build();

// Apply pending migrations on startup — retry until Postgres is ready
using (var scope = app.Services.CreateScope())
{
  var db = scope.ServiceProvider.GetRequiredService<TodoDbContext>();
  var logger = scope.ServiceProvider.GetRequiredService<ILogger<TodoDbContext>>();
  var retries = 10;
  while (retries-- > 0)
  {
    try
    {
      await db.Database.MigrateAsync();
      break;
    }
    catch (Exception ex) when (retries > 0)
    {
      logger.LogWarning(
        "Database not ready, retrying in 3s... ({Retries} attempts left). Error: {Message}",
        retries,
        ex.Message
      );
      await Task.Delay(TimeSpan.FromSeconds(3));
    }
  }
}

// Configure the HTTP request pipeline.
if (app.Environment.IsDevelopment()) app.MapOpenApi();

app.UseHttpsRedirection();

app.MapGet("/health", () => Results.Ok(new { status = "Healthy" }));

app.MapTodoEndpoints();

app.Run();
Focus here: the app is Kubernetes-aware in two places. It resolves both PostgreSQL and RabbitMQ from connection strings injected by Kubernetes, and it retries EF Core migrations on startup so the pod can survive the common race where Postgres is still booting when the app starts.
The /health endpoint serves the Kubernetes liveness and readiness probes. The MapTodoEndpoints() call registers the full CRUD surface: GET /todos, GET /todos/{id}, POST /todos, PUT /todos/{id}, and DELETE /todos/{id}. On POST, the handler publishes a TodoCreatedEvent to RabbitMQ, a small but real integration that proves the broker connection works end to end.
The deployment manifest connects the app to its dependencies through Kubernetes-native configuration. Connection strings come from a Secret injected as environment variables; non-sensitive settings come from a ConfigMap mounted as /app/appsettings.json. .NET's configuration pipeline picks both up automatically:
Source: k8s/app/app-deployment.yaml
apiVersion: apps/v1
kind: Deployment
metadata:
  name: todo-app
  namespace: dotnet-k8s
  labels:
    app: todo-app
spec:
  replicas: 3
  selector:
    matchLabels:
      app: todo-app
  template:
    metadata:
      labels:
        app: todo-app
    spec:
      initContainers:
        - name: wait-for-postgres
          image: busybox:1.37
          command:
            - sh
            - -c
            - |
              until nc -z postgres-service 5432; do
                echo "Waiting for postgres-service..."
                sleep 2
              done
      containers:
        - name: todo-app
          image: dotnet-k8s-setup:latest
          imagePullPolicy: IfNotPresent
          ports:
            - containerPort: 8080
          env:
            - name: ASPNETCORE_HTTP_PORTS
              value: '8080'
            - name: ASPNETCORE_ENVIRONMENT
              value: 'Production'
          envFrom:
            - secretRef:
                name: todo-app-secret
          securityContext:
            runAsNonRoot: true
            allowPrivilegeEscalation: false
          volumeMounts:
            - name: config-volume
              mountPath: /app/appsettings.json
              subPath: appsettings.json
              readOnly: true
            - name: tmp
              mountPath: /tmp
          livenessProbe:
            httpGet:
              path: /health
              port: 8080
            initialDelaySeconds: 15
          readinessProbe:
            httpGet:
              path: /health
              port: 8080
      volumes:
        - name: config-volume
          configMap:
            name: todo-app-config
        - name: tmp
          emptyDir: {}
Focus here: this manifest layers three kinds of Kubernetes concerns on top of the app. The initContainer blocks startup until Postgres accepts TCP connections, envFrom and the ConfigMap mount feed configuration into the .NET host without code changes, and the security/probe sections make the deployment explicit about non-root execution and health checks.
The Secret contains the application connection strings plus the PostgreSQL password that the database deployment consumes:
Source: k8s/app/secret.yaml
# Secret holds sensitive configuration for the DotnetK8sSetup app.
# The keys use the double-underscore convention which .NET Configuration
# maps automatically when injected as environment variables.
#
# IMPORTANT: Replace these values before applying to a real cluster.
apiVersion: v1
kind: Secret
metadata:
  name: todo-app-secret
  namespace: dotnet-k8s
type: Opaque
stringData:
  ConnectionStrings__DefaultConnection: 'Host=postgres-service;Port=5432;Database=todos;Username=app;Password=Ch4ng3Me!'
  ConnectionStrings__RabbitMq: 'amqp://guest:guest@rabbitmq-service:5672'
  Postgres__Password: 'Ch4ng3Me!'
Focus here: one Secret coordinates both sides of the stack. The .NET pod reads the ConnectionStrings__... values through envFrom, while the PostgreSQL deployment reads Postgres__Password through valueFrom.secretKeyRef, so the app and its backing service stay in sync.
The double-underscore convention (ConnectionStrings__DefaultConnection) is a .NET Configuration feature: when injected as an environment variable, it maps to ConnectionStrings:DefaultConnection in the configuration tree, overriding any file-based value. No code changes are needed; the naming convention does the work.
PostgreSQL and RabbitMQ are deployed as in-cluster services, suitable for a demo. Their full manifests are here: k8s/app/postgres.yaml and k8s/app/rabbitmq.yaml.
Build the image and import it into each cluster:
docker build -t dotnet-k8s-setup:latest .
k3d image import dotnet-k8s-setup:latest -c rancher-mgmt
k3d image import dotnet-k8s-setup:latest -c workload-dev   # multi-cluster demo
Now deploy from the Rancher UI. Click Import YAML in the top-right corner, paste all seven files from k8s/app/ (namespace.yaml, secret.yaml, configmap.yaml, postgres.yaml, rabbitmq.yaml, app-deployment.yaml, app-service.yaml), and click Import. The UI parses real Kubernetes YAML and hands it to the cluster unchanged: Secret, ConfigMap, Postgres, RabbitMQ, and the .NET deployment, all in one batch.
Verify from the terminal:
kubectl port-forward -n dotnet-k8s svc/todo-app-service 8080:80
curl http://localhost:8080/todos
# []

curl -X POST http://localhost:8080/todos \
  -H "Content-Type: application/json" \
  -d '{"title":"Deployed from Rancher UI"}'
# {"id":"...","title":"Deployed from Rancher UI","isComplete":false,...}
This is the "UI = YAML" proof: Rancher does not have its own deployment format. What you click in the UI is exactly what kubectl apply would do, whether for a single deployment or an entire multi-service stack.
RBAC: Cluster Roles vs Project Roles
With one team and one cluster, RBAC is a formality. The moment a second person appears, "who can see what" becomes the question, and Rancher's answer has two levels:
| Role level | Grants | Example |
|---|---|---|
| Cluster role | Operate the cluster itself | Cluster Member: sees all projects and namespaces |
| Project role | Operate workloads inside a project | Project Member: manages apps in team-a only |
The demo creates a restricted user:
- Users & Authentication → Create → user
alice, password of your choice, role Standard User. - Open the
localcluster → Members → Add → role Project Member for projectteam-a. - Log out, log in as
alice.
Alice sees exactly one project and its namespace. She does not see other projects, other clusters, or cluster-level resources. The same RBAC applies to every cluster Rancher manages, which is the point: one user model, many clusters.
Managing Multiple Clusters
Now the demo earns its name. Create the second cluster with no port mappings. Rancher will reach it through an agent connection, not through inbound ports:
Source: scripts/setup-workload-cluster.sh
#!/usr/bin/env bash
set -euo pipefail

CLUSTER_NAME="workload-dev"

info()  { printf "  ⓘ  %s\n" "$*"; }
ok()    { printf "  ✔  %s\n" "$*"; }
fail()  { printf "  ✘  %s\n" "$*"; exit 1; }

command -v k3d >/dev/null 2>&1 || fail "k3d not found."

if k3d cluster list 2>/dev/null | grep -q "^$CLUSTER_NAME"; then
  info "Cluster '$CLUSTER_NAME' already exists. Deleting..."
  k3d cluster delete "$CLUSTER_NAME"
fi

k3d cluster create "$CLUSTER_NAME" \
  --servers 1 \
  --servers-memory 2g

k3d kubeconfig merge "$CLUSTER_NAME" \
  --kubeconfig-merge-default \
  >/dev/null 2>&1 || true
kubectl config use-context "k3d-rancher-mgmt" >/dev/null 2>&1 || true
Focus here: the script intentionally switches the current context back to k3d-rancher-mgmt after merging kubeconfig. That keeps you on the management cluster while you continue working in the Rancher UI, and only the import command itself needs to target workload-dev.
Then in the Rancher UI: Cluster Management → Import Existing → Generic → Create. Rancher generates a command for you to run. It is a normal kubectl apply that installs an agent inside workload-dev:
kubectl apply -f https://rancher.local/v3/import/<generated-token>.yamlThe agent pod connects outbound to https://rancher.local and keeps the cluster registered. Nothing needs to reach into the cluster: no inbound firewall rules, no public IP, no VPN, and no internet DNS after the local hosts entry is in place. It is the same model Rancher uses to manage clusters on-premises or behind NAT.
If the agent cannot reach Rancher, check two things. First, rancher.local must resolve inside workload-dev to the host gateway (host.k3d.internal, typically 192.168.65.254 on Docker Desktop). Second, the Rancher ingress must actually route traffic: curl -k https://rancher.local/ping should return pong from anywhere that can reach the cluster.
Recommended addition from the field. The import command installs two agents:
cattle-cluster-agent(cluster-level operations and state sync) andcattle-node-agentas a DaemonSet (kubectl exec, log streaming, node metrics). Both initiate outbound connections on port 443, so imported clusters need no inbound firewall rules. For clusters behind NAT or strict egress, enable agent tunnel mode so all API traffic flows through the agent's WebSocket connection.
%%{init: {
  'theme': 'base',
  'themeVariables': {
    'background': '#ffffff',
    'primaryColor': '#ffffff',
    'primaryTextColor': '#2c3e50',
    'primaryBorderColor': '#bdc3c7',
    'lineColor': '#34495e',
    'secondaryColor': '#f8f9fa',
    'tertiaryColor': '#f1f3f5',
    'fontFamily': 'Segoe UI, Arial, sans-serif',
    'fontSize': '14px',
    'edgeLabelBackground': '#ffffff',
    'nodeBorder': '2px',
    'mainBkg': '#ffffff',
    'nodePadding': '12px',
    'subGraphBkg': '#fafbfc',
    'subGraphBorder': '#dfe6e9'
  }
}}%%
sequenceDiagram
    participant UI as Rancher UI
    participant Dev2 as workload-dev cluster
    participant Agent as cattle-cluster-agent

    UI->>UI: Generate import command (token)
    UI->>Dev2: kubectl apply import manifest (you run it)
    Dev2->>Agent: Schedule agent pod
    Agent->>UI: Outbound connection to Rancher (443)
    loop Keep-alive
        Agent-->>UI: Heartbeat, watches for changes
        UI-->>Agent: Desired state (apps, policies)
    end
    UI->>UI: workload-dev shows Active
Within a minute or two, workload-dev shows Active in Cluster Management. You now have two clusters under one management plane. Projects, RBAC, and the workload list all work identically on both. That is the moment kubectl stops being the organizing principle of your operations.
Fleet: GitOps for Clusters
The last piece is delivery. Manually deploying to two clusters with kubectl is already tedious; a dozen clusters is impossible. Rancher's answer is Fleet, a GitOps engine bundled with the platform. Fleet watches a Git repository and rolls out the YAML it finds there to the clusters you select.
The sample ships a GitRepo resource that points at the devops-samples repository and targets every registered cluster:
Source: k8s/fleet-gitrepo.yaml
# Fleet GitRepo — the sample manifests, applied to every cluster Rancher manages.
#
# This is the GitOps path: Fleet (bundled with Rancher) watches this repository
# and rolls out the YAML under `rancher-multi-cluster-setup/k8s/app` to every
# cluster selected by `clusterSelector: {}` (all of them).
#
# Create it with:
#   kubectl apply -f k8s/fleet-gitrepo.yaml
#
# The GitRepo resource lives in the `fleet-default` namespace, which targets
# every registered cluster by default. Per-cluster overrides use the
# `fleet-default` / `fleet-<cluster-name>` namespaces instead.
apiVersion: fleet.cattle.io/v1alpha1
kind: GitRepo
metadata:
  name: dotnet-k8s-setup
  namespace: fleet-default
spec:
  repo: https://github.com/mehdihadeli/devops-samples
  branch: main
  paths:
    - rancher-multi-cluster-setup/k8s/app
  targets:
    - clusterSelector: {}
Focus here: clusterSelector: {} is the multi-cluster lever. This one resource tells Fleet to build a bundle for every registered cluster, so the same app manifests fan out to local and workload-dev with no cluster-specific kubectl apply step.
Apply it once:
kubectl apply -f k8s/fleet-gitrepo.yamlFleet clones the repository, finds the rancher-multi-cluster-setup/k8s/app path, builds a Bundle per matched cluster, and hands each bundle to that cluster's Fleet agent. The agent applies it. The app now runs on rancher-mgmt and workload-dev, and nobody ran kubectl apply on either cluster to make it happen.
%%{init: {
  'theme': 'base',
  'themeVariables': {
    'background': '#ffffff',
    'primaryColor': '#ffffff',
    'primaryTextColor': '#2c3e50',
    'primaryBorderColor': '#bdc3c7',
    'lineColor': '#34495e',
    'secondaryColor': '#f8f9fa',
    'tertiaryColor': '#f1f3f5',
    'fontFamily': 'Segoe UI, Arial, sans-serif',
    'fontSize': '14px',
    'edgeLabelBackground': '#ffffff',
    'nodeBorder': '2px',
    'mainBkg': '#ffffff',
    'nodePadding': '12px',
    'subGraphBkg': '#fafbfc',
    'subGraphBorder': '#dfe6e9'
  }
}}%%
flowchart LR
    classDef external fill:#f5f5f5,stroke:#616161,color:#424242
    classDef broker fill:#f3e5f5,stroke:#7b1fa2,color:#4a148c
    classDef messaging fill:#e0f2f1,stroke:#00796b,color:#004d40
    classDef compute fill:#e3f2fd,stroke:#1565c0,color:#0d47a1
    classDef db fill:#e3f2fd,stroke:#1976d2,color:#0d47a1

    GitRepo["Git repository<br/>github.com/mehdihadeli/devops-samples"]:::external

    subgraph Rancher["Management plane (rancher-mgmt)"]
        direction TB
        FleetController["fleet-controller<br/>watches GitRepo"]:::broker
        Bundles["Bundle (per cluster)"]:::messaging
    end

    subgraph Clusters["Clusters"]
        direction LR
        Local["rancher-mgmt (local)<br/>fleet-agent applies"]:::compute
        Dev2["workload-dev<br/>fleet-agent applies"]:::compute
    end

    GitRepo -->|"clone + poll"| FleetController
    FleetController --> Bundles
    Bundles --> Local
    Bundles --> Dev2
The operational payoff: edit a manifest, push to main, and Fleet rolls the change out to every selected cluster. Drift is visible in the UI. A bundle stuck on "modified" is a cluster that is not converging.
One practical caveat: the GitRepo points at https://github.com/mehdihadeli/devops-samples and expects the path rancher-multi-cluster-setup/k8s/app to exist in that repository. Until the sample is published there, Fleet reports no resource found at the following paths. For local testing before publication, apply the manifests directly to each cluster:
kubectl --context k3d-rancher-mgmt apply -f k8s/app/
kubectl --context k3d-workload-dev apply -f k8s/app/
For the demo, also remember the image caveat: Fleet deploys manifests as-is, so dotnet-k8s-setup:latest must exist in each cluster (k3d image import dotnet-k8s-setup:latest -c workload-dev as well). In production the image lives in a registry, and both caveats disappear.
When to Skip Rancher
Every tool has an honest boundary, and Rancher's is easy to state: if you have one cluster and one person, Rancher is overhead. The UI is pleasant, but kubectl plus a good k9s session covers a solo developer's needs with zero moving parts. Rancher earns its 4 GB and its cattle-system namespace the moment any of these is true:
- More than one cluster, especially clusters on different infrastructure.
- More than one team, where namespace visibility and quotas need an owner.
- Audited access, where "who changed what" needs an answer.
- GitOps at scale, where the delivery pipeline should be uniform across clusters.
The sample's two clusters exist precisely so you can feel where that boundary is: a single k3d cluster from the previous article does not need Rancher; two clusters sharing one management plane, RBAC, and GitOps pipeline is the shape Rancher was built for.
Conclusion
This article took the story one step past the previous one. The first article in this series made a single cluster legible: k3d on the laptop, MetalLB for bare metal, and the Ingress versus Gateway API decision for traffic. This article made many clusters legible. Rancher Manager, installed on k3d as a Helm chart, imports its own cluster as local and organizes namespaces into projects with real RBAC boundaries. It deploys the same .NET 10 todo API, backed by PostgreSQL and RabbitMQ, through the UI using the exact same YAML a kubectl apply would use. It imports a second k3d cluster through an outbound agent connection, and Fleet delivers the entire stack to both clusters from a Git repository.
The reusable insight is the management-plane model: Rancher is not a Kubernetes replacement but a layer above it, talking to each cluster through its ordinary API. The projects, RBAC, import, and GitOps pieces of the demo all map unchanged to production clusters, whether they run k3s, RKE2, or a managed offering. The complete sample is in the rancher-multi-cluster-setup repository: two scripts create the clusters, one script installs Rancher, one manifest imports GitOps, and the same todo API from the previous article, now with PostgreSQL and RabbitMQ, proves the whole thing is alive on both clusters.
The natural next chapter is production: hardening a Rancher-managed fleet with GitOps-driven upgrades, observability through Rancher's monitoring stack, and policy enforcement across clusters. But the laptop demo in this article is the right place to start, because it makes the two hard ideas concrete in one sitting: Rancher manages itself, and it manages everything else the same way.
Recommended addition from the field. Before taking Rancher to production, enable the Rancher backup operator from day one. It protects the management plane, including cluster registrations, users, RBAC bindings, and settings, so a failed upgrade or database corruption does not force you to re-import every cluster. Also size the management cluster for growth: a dedicated 3-node cluster with 4 cores and 8 GB per node comfortably handles up to 50 downstream clusters, and testing upgrades in a non-production cluster for 24-48 hours before touching production is cheap insurance.